Quick answer: To detail a sports car, cool the car in shade, clean wheels and brakes first with a non-acidic cleaner, snow foam, hand wash using two buckets, decontaminate with iron remover and clay, dry with a blower or plush microfiber, inspect under strong light, polish only if needed, protect with wax, sealant, or ceramic coating, then clean the interior with material-specific products.
That’s the short version. The long version is where the difference between a clean car and a properly detailed one lives. Sports cars have softer clear coats, exotic materials, huge brakes, and bodywork that sits inches off the road. Every one of those details changes how you should clean them.
This guide covers the full process, what it costs, what professionals do differently, and the mistakes that cost owners thousands in paint repair.
What Makes Sports Car Detailing Different?
Detailing a family hatchback and detailing a performance coupe use the same basic steps, but the margin for error is very different. Here’s why:
Soft, thin clear coat. Many performance and luxury manufacturers use paint that marks easily, and dark colors show every swirl. There’s also limited clear coat thickness to work with, so each aggressive polish removes material you can’t get back.
Protective layers you can damage. Paint protection film (PPF), vinyl wraps, and ceramic coatings are common on sports cars. The wrong solvent, a pressure washer held too close to a film edge, or an abrasive polish can lift or dull them.
Exotic materials everywhere. Exposed carbon fiber, Alcantara, perforated leather, and piano black trim each react differently to chemicals.
Performance brakes and wheels. Big brakes generate heavy brake dust, and carbon-ceramic rotors, painted calipers, and forged wheels don’t tolerate harsh acidic cleaners.
Low, aggressive bodywork. Front splitters, side skirts, and rear diffusers sit right in the spray of road grime, tar, and stone chips.
Before You Start: Know Your Car’s Surface
This is the step almost every guide skips. Before you pick a single product, identify what you’re actually cleaning.
Gloss paint is the most forgiving. You can wash, clay, polish, and protect it with standard methods.
Matte or satin paint must never be polished, waxed, or clayed aggressively. Polishing flattens the texture that creates the matte look, leaving shiny patches that can’t be undone. Use matte-specific shampoo and sealant only.
PPF-wrapped panels can be washed normally, but avoid solvent-heavy tar removers, keep pressure washer nozzles at a safe distance from film edges, and check that your clay or polish is film-safe.
Vinyl wraps need similar care to PPF, plus no polishing compounds and no waxes containing petroleum distillates.
Ceramic-coated cars need only a gentle pH-neutral wash and an occasional ceramic booster spray. Heavy clay or polish removes the coating you paid for.
Tools and Products for Sports Car Detailing
Washing: pH-neutral shampoo, snow foam, foam cannon or pump sprayer, two buckets with grit guards, several microfiber wash mitts (separate ones for lower panels)
Wheels and brakes: pH-neutral wheel cleaner, soft spoke brushes, a long wheel-barrel brush, a separate bucket and mitt used only for wheels
Decontamination: iron fallout remover, tar remover, clay bar or clay mitt with lubricant
Drying: twisted-loop or plush microfiber drying towels, a car blower or filtered air dryer
Correction and protection: dual-action (DA) polisher, foam pads, finishing polish, IPA panel wipe, carnauba wax, synthetic sealant, or ceramic coating
Pro-level extras: paint depth gauge, LED inspection light, masking tape for trim and carbon edges
Interior: soft-brush vacuum attachments, detailing brushes, pH-balanced leather cleaner and conditioner, Alcantara cleaner, electronics-safe interior detailer, ammonia-free glass cleaner
How to Detail a Sports Car: Step-by-Step
Step 1: Park in Shade and Let Everything Cool
Heat is the enemy of good detailing. Hot panels dry soap and chemicals before you can rinse them, leaving spots and streaks that are hard to remove. Big brakes stay hot long after a drive, and spraying cleaner onto hot rotors or calipers can cause staining. Wait until the paint and wheels are cool to the touch.
Step 2: Clean Wheels, Tires, and Brakes First
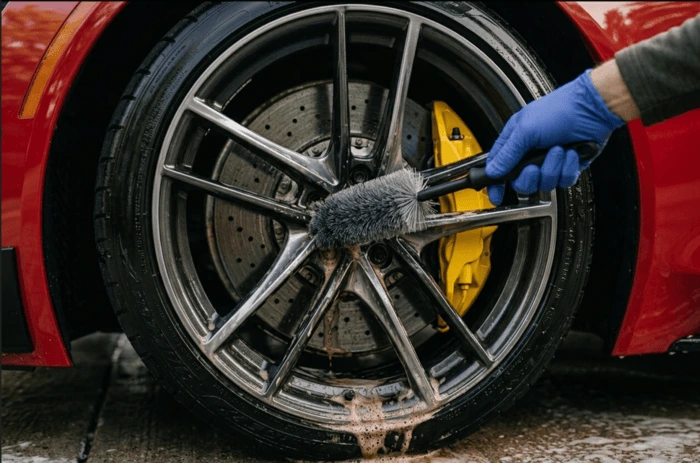
Wheels carry the heaviest contamination on the car. Cleaning them first means any splash lands on paint you haven’t washed yet.
Work one wheel at a time. Spray a pH-neutral wheel cleaner, let it dwell briefly, then agitate the face, the spokes, the barrel behind the spokes, and around the lug nuts. Clean the calipers with a soft brush. If your car has carbon-ceramic brakes, keep acidic and strong alkaline cleaners away from the rotors entirely. Scrub the tires with a stiff brush until the foam runs clean, then rinse.
Step 3: Pre-Rinse and Snow Foam
The goal here is to remove as much grit as possible before anything touches the paint. Rinse from top to bottom, paying extra attention to the splitter, side skirts, diffuser, and wheel arches.
Next, cover the car in snow foam and let it dwell for a few minutes without drying. The foam softens and lifts dirt so it rinses away instead of being dragged across the clear coat by your mitt. Rinse thoroughly.
Step 4: Two-Bucket Contact Wash
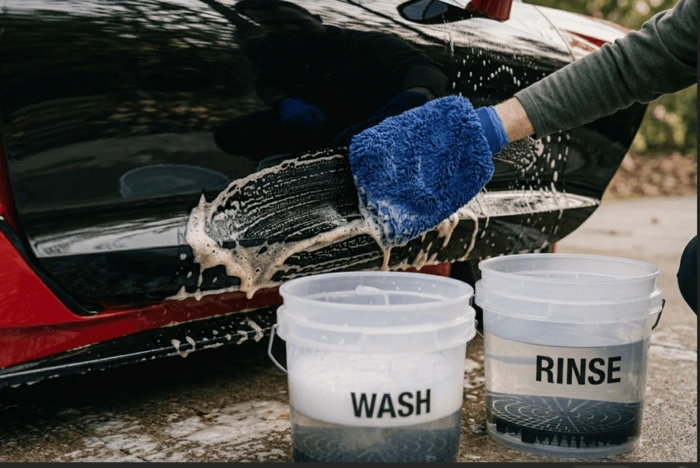
Fill one bucket with shampoo solution and one with clean rinse water, each with a grit guard. Load your mitt with soap, wash a small section in straight overlapping lines, then rinse the mitt in the clean bucket before reloading. The grit guard traps dirt at the bottom so it doesn’t return to your mitt.
Wash from the roof down, since the lowest panels are the dirtiest. Switch to a separate mitt for the bumpers, skirts, and diffuser.
Step 5: Decontaminate the Paint
Washing removes loose dirt, but bonded contaminants stay behind. Run your hand (inside a thin plastic bag) across the paint. If it feels gritty, it needs decontamination.
Spray iron remover on paint and wheels. It changes color as it dissolves embedded metal particles from brake dust. Rinse, then use tar remover on lower panels if needed. Finally, glide a clay bar or clay mitt over each panel with plenty of lubricant until the surface feels glass-smooth. Skip or limit claying on matte paint and ceramic coatings.
Step 6: Dry Without Scratching
Drying is where many swirl marks are born. A car blower pushes water off panels and out of mirrors, badges, grilles, and wheel lug holes with zero contact. For the rest, lay a plush drying towel on the panel and pat or pull it gently. Never rub hard, and never use a squeegee blade on paint.
Step 7: Inspect Under Strong Light
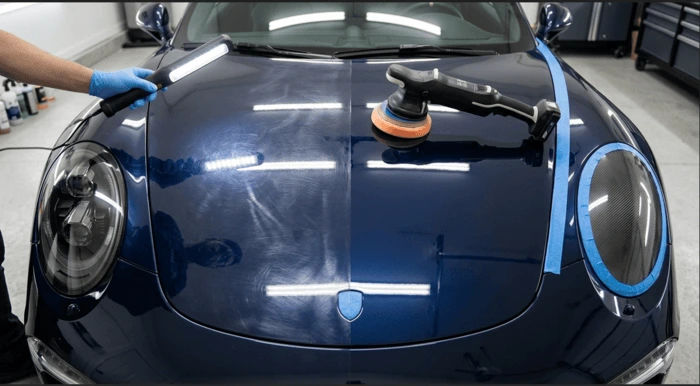
Professionals don’t guess. Use an LED inspection light or direct sunlight to look for swirls, holograms, water spots, and scratches. A paint depth gauge tells you how much clear coat you have to work with before you ever pick up a polisher. This step decides whether the car needs correction or can go straight to protection.
Step 8: Paint Correction (Only If Needed)
If you find defects, polishing can remove them by leveling a microscopic layer of clear coat. Mask off rubber trim, badges, and carbon fiber edges first. Start with the least aggressive pad and polish combination on a small test spot, and only step up if it doesn’t work.
Be honest with yourself here. On thin sports car paint, aggressive compounding or a rotary polisher in inexperienced hands can burn through clear coat on edges and body lines. This is the step where most owners hand the car to a professional.
Step 9: Protect the Finish
After cleaning and correcting, wipe the paint with an IPA panel prep to remove polishing oils, then apply your protection:
Carnauba wax gives a deep, warm glow but lasts only weeks.
Synthetic sealant lasts months and handles heat better.
Ceramic coating forms a hard, long-lasting layer with strong water beading, UV resistance, and easier future washes.
Graphene-infused coatings are a newer option marketed for improved heat dissipation and water spot resistance.
Pair a coating with PPF on the front bumper, hood, and mirrors if you drive on highways, where stone chips are the biggest threat to low-slung cars.
Step 10: Glass, Trim, and Exhaust Tips
Clean glass with an ammonia-free cleaner, which is safe on tint. Wipe exposed carbon fiber gently with a quick detailer. Gloss carbon can be protected with a spray sealant; matte carbon needs a matte-safe product. Dress plastic and rubber trim with a UV protectant. Polish exhaust tips with a metal polish matched to their finish, but check first, since titanium tips with heat-blued coloring should not be polished.
Step 11: Detail the Interior
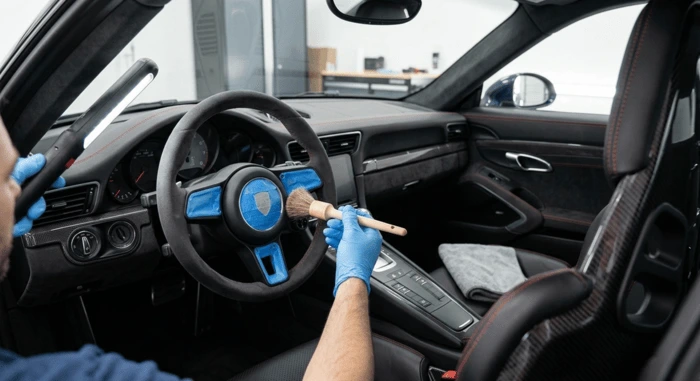
Sports car cabins are small but packed with delicate materials.
Vacuum with a soft brush attachment, especially around stitching and seat bolsters. For leather, use a pH-balanced cleaner and a soft brush, then condition to prevent cracking. Perforated leather needs a light touch so cleaner doesn’t soak into the holes.
Alcantara is the trickiest. Use a dedicated Alcantara cleaner sparingly, work it with a soft brush, and blot rather than scrub. Steering wheels and seat bolsters pill and mat from skin oils, so regular light cleaning prevents permanent damage.
Spray interior cleaners onto a microfiber towel, never directly onto screens, buttons, or gauges. Piano black trim scratches easily, so use a fresh, clean towel with very light pressure.
Step 12: Convertible Tops, Frunks, and Engine Bays
Fabric soft tops need a dedicated fabric cleaner and a soft brush, then a fabric protectant to restore water repellency. Never use a pressure washer at close range on seams.
Frunks and rear trunks collect dust and leaves. Vacuum them and wipe the seals.
Engine bays on front, mid, or rear-engine cars can be cleaned with a light degreaser and low-pressure rinse. Cover the intake, alternator, and exposed electrical connectors, and work only when the engine is cool.
How to Detail Your Car Like a Professional
Pros don’t have secret products. They have better habits. Here’s what separates a professional detail from a weekend wash:
They inspect before and after. Every job starts with a paint inspection and often a paint depth reading, so there are no surprises.
They follow a strict order. Wheels first, top to bottom, exterior before protection, interior last.
They separate tools. Wheel brushes never touch paint. Lower panel mitts never touch the roof. Interior towels never touch exhaust tips.
They look after their microfiber. Towels are washed separately with a microfiber detergent, no fabric softener, and air dried or tumbled on low heat. One dirty towel can undo hours of polishing.
They use the least aggressive method first. Gentler chemicals, softer pads, lighter pressure, then step up only if needed.
They control the environment. Shade, cool panels, and good lighting matter as much as products.
They test first. Every new chemical or polish gets tested on a hidden area.
Adopt these habits and your DIY results will improve more than any expensive product can deliver.
Waterless and Rinseless Washing for Sports Cars
Not every clean needs buckets and a pressure washer. Waterless and rinseless washes are excellent for regular maintenance, especially if you live in an apartment or want to save water.
A waterless wash uses a high-lubricity spray. You mist a panel, wipe gently in one direction with a plush microfiber to lift dirt, then buff with a second towel. It’s ideal for light dust and fingerprints on well-protected paint.
A rinseless wash uses a concentrated solution in a single bucket. You wash each panel with a soaked microfiber or sponge and dry immediately, with no rinsing needed.
When not to use them: heavy mud, sand, road salt, or thick grime. In those cases, a traditional pre-rinse and foam wash is the only safe option. Doorstep detailing teams, including CleanCarma, use professional rinseless and low-water techniques to clean cars safely wherever they’re parked.
Cleaning After a Track Day or Spirited Drive
Track driving leaves contamination a normal commute doesn’t. Hot tire rubber (“marbles”) sticks to lower panels, brake dust bakes onto wheels, and bugs hit the front end at speed.
Clean as soon as the car has cooled. Soak bug splatter with a bug remover before washing, since acidic bug residue can etch paint in the sun. Use tar remover on rubber pickup behind the wheels, and give the wheels a full iron decontamination.
Detailing in Hot, Dusty, and Hard-Water Climates
Climate changes how often and how carefully you need to detail.
Heat and UV fade trim, dry out leather, and bake contaminants into paint. Park in shade or use a breathable car cover, and choose sealants or coatings over wax, which breaks down faster in heat.
Dust and sand are abrasive. Never wipe a dusty car with a dry cloth. Always pre-rinse or use a high-lubricity waterless product.
Hard water leaves mineral spots that can etch into clear coat if left in the sun. Dry immediately after every wash, and consider filtered or deionized water for the final rinse.
Bird droppings and tree sap become more aggressive in the heat. Remove them as soon as you see them.
Storing a Low-Mileage Sports Car
Many sports cars are weekend-only vehicles. Sitting still brings its own problems. Before storage, give the car a full wash and protection so contaminants don’t sit on the paint for weeks. Use a soft, breathable indoor cover (plastic traps moisture). Condition the leather, keep the battery on a maintainer, and consider inflating tires slightly to reduce flat spots. A quick waterless wipe-down before each drive keeps dust from building up.
What Is the Typical Cost to Detail a Car?
Pricing depends on vehicle size, condition, and service level. According to recent 2026 industry pricing guides, interior details typically run $50–$350, exterior details run $100–$350, and full details range from $150 to $500 or more, with higher prices for larger vehicles or specialty work like paint correction or ceramic coating.
Here’s how the main service levels generally break down:
| Service | Typical Price (USD) |
|---|---|
| Basic wash and interior vacuum | $50–$125 |
| Standard full detail | $150–$300 |
| Premium detail (polish, sealant) | $250–$500 |
| Paint correction | $300–$1,000+ |
| Ceramic coating | $500–$2,500+ |
These ranges draw on 2026 pricing data: basic details at $50–$125, full/premium details at $250–$500, paint correction from $300 to over $1,000, and ceramic coating from $500 to over $2,500.
Sports cars usually cost more, even though they’re smaller. The extra time spent on delicate materials, low bodywork, complex wheels, and careful paint work adds labor. One industry guide places luxury vehicle full detailing at $400–$600 or more.
Mobile vs. shop detailing: Doorstep services are usually priced close to shop detailing. As one detailer explains, mobile detailing may cost slightly more due to travel time and setup, while shops require you to drop the car off, and both can deliver professional results.
DIY cost: A starter kit of quality shampoo, buckets, grit guards, mitts, towels, wheel cleaner, iron remover, clay, and a spray sealant typically costs less than a single professional full detail, but a DA polisher, pads, and coating products add significantly more.
What Not to Do When Detailing a Car
These are the mistakes that cause the most damage, especially on sports cars:
- Using dish soap or household cleaners. They strip protection and dry out rubber and leather.
- Driving through brush car washes. Rotating brushes hold grit from hundreds of previous cars and scratch soft clear coats.
- Washing in direct sun. Products dry too fast and leave spots.
- Using one bucket or one mitt for everything. You’re rubbing wheel grit into your paint.
- Wiping a dusty car with a dry towel. This is sandpaper in slow motion.
- Spraying acidic wheel cleaners on sensitive finishes. Carbon-ceramic brakes, polished wheels, and painted calipers can stain.
- Polishing matte paint or wraps. It permanently ruins the finish.
- Over-polishing thin clear coat. Every correction removes paint you can’t replace.
- Holding a pressure washer too close to PPF edges, badges, or soft top seams.
- Letting water air dry. Mineral spots can etch the paint.
- Soaking Alcantara or perforated leather. Excess moisture damages both.
- Spraying cleaner directly on screens and buttons.
- Washing microfiber with fabric softener or cotton laundry. It clogs the fibers and adds lint.
- Applying ceramic coating over uncorrected paint. It locks in swirls for years.
- Using greasy dressings on the steering wheel or pedals. It’s slippery and unsafe.
How Often Should You Detail a Sports Car?
| Frequency | What to Do |
|---|---|
| After every drive (as needed) | Remove bugs, bird droppings, sap |
| Every 1–2 weeks | Safe hand wash or rinseless wash, quick interior wipe |
| Every 1–3 months | Decontamination, sealant or coating booster, full interior clean |
| Every 6–12 months | Full detail with inspection, light polish if needed, protection refresh |
Cars driven daily, parked outside, or used on track need the shorter end of each range.
Does Detailing Protect Your Car’s Value?
Yes. Paint condition, interior wear, and overall presentation all affect resale price, and for sports cars, buyers look closely. Swirled paint, worn Alcantara, and faded trim are negotiating points against you. A documented detailing and protection history, on the other hand, signals a car that was cared for.
This ties into a common car ownership question.
What Is the $3,000 Rule for Cars?
The “$3,000 rule” isn’t about detailing, but it comes up often among car owners, and it has two common meanings.
The repair rule (keep or trade): One version says to watch your annual repair spending. Autoblog explains that if repair bills pass roughly $3,000 per year after year eight, you’re entering trade-now territory, and recommends comparing repair estimates with depreciation and replacing the car only if repair costs outpace it.
The buying rule: Another version is a budgeting guideline. It suggests that if you can’t afford to spend at least $3,000 upfront, you may not be financially ready for the true cost of owning a car. It’s commonly used as a minimum budget for buying a used car with cash, or as a recommended down payment when financing.
How detailing fits in: Whichever version you follow, the idea is the same: plan for the real cost of ownership. Regular detailing is a small, predictable expense that protects paint, interior, and resale value, which matters when you eventually sell or trade in your sports car.
DIY vs. Professional Sports Car Detailing
| Task | DIY Friendly? |
|---|---|
| Maintenance wash | ✅ Yes |
| Waterless/rinseless wash | ✅ Yes |
| Wheel cleaning | ✅ Yes |
| Iron decon and clay | ✅ Yes, with care |
| Interior leather cleaning | ✅ Yes |
| Alcantara restoration | ⚠️ Careful |
| Paint correction | ⚠️ Best left to pros |
| Ceramic coating application | ⚠️ Best left to pros |
| PPF installation | ❌ Professional only |
If you enjoy the process, DIY maintenance is rewarding. For correction, coatings, and deep interior restoration, a professional detailer has the tools, experience, and paint measuring equipment to do it safely.
Get Your Sports Car Detailed at Your Doorstep with CleanCarma
Don’t have the time, space, or equipment? CleanCarma brings professional sports car detailing to your home or office. Our trained detailers use pH-neutral, paint-safe products, separate wash media for every surface, and low-water techniques that work wherever your car is parked. From maintenance washes to full interior and exterior detailing, we treat your car with the care it deserves.
👉 Book your doorstep sports car detail with CleanCarma today
Frequently Asked Questions
How do I detail my car like a professional?
Follow a strict order (wheels first, then top-down washing, decontamination, drying, inspection, correction, protection, interior), use two buckets and separate tools for wheels, paint, and interior, inspect under strong light, and always start with the gentlest product and technique.
What is the typical cost to detail a car?
Most full details cost between about $150 and $500, depending on vehicle size, condition, and services included. Paint correction and ceramic coating cost more, and sports and luxury cars often sit at the higher end.
What not to do when detailing a car?
Avoid dish soap, brush car washes, washing in direct sunlight, using one mitt for the whole car, dry-wiping dust, air drying, and polishing matte paint or wraps.
What is the $3,000 rule for cars?
It usually refers to either trading in a car once annual repairs exceed about $3,000, or having at least $3,000 set aside before buying a car to cover real ownership costs.
How long does it take to detail a sports car?
A maintenance wash takes about 1–2 hours. A full detail can take most of a day, and paint correction with ceramic coating can take multiple days, including cure time.
Can I use a waterless wash on a sports car?
Yes, for light dust and fingerprints on protected paint. Avoid it on heavy mud, sand, or salt, which need a proper pre-rinse.
How do I clean carbon-ceramic brakes?
Use a pH-neutral wheel cleaner and soft brushes, avoid acidic or harsh alkaline products, and never clean them while hot.
Can I polish matte paint?
No. Polishing removes the texture that creates the matte finish. Use only matte-specific shampoo and sealant.